Articles
- Professional HDR Images
- Lomo Photography
- Color Correction
- Advanced Photo Sharpening
- Controlled Image Sharpening
- Dynamic Lighting
- Vanishing Point Filter
- Stitch-Photos
- Facial Retouching
- Photorealistic Coloring
- Removing Objects From Photos
- Black and White
- Change Hair Color
- Advanced Skin Softening
- Red Eye Tool
- Whitening Teeth & Eyes
- Age Progression
- Paint Lip Gloss
- Contrast Layers
- Illustration Vector Effect
- Using Ink Drops
- Light effects
- Colorful Picture Style
- Vector Portraits
- Vector Composite Effect
- Star Diffusion
- Photo Restoration
- Black and white portrait
- Selecting and extracting hair
Videos
Contrast Layers
Step 1
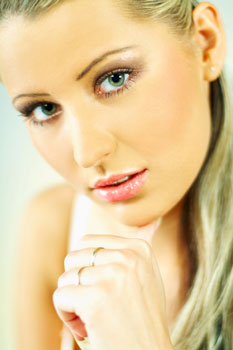
Open a photo you would like to edit. Or, you may use the photo used in this tutorial (from iStockPhoto).
Step 2
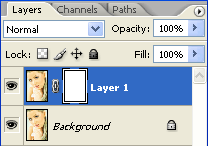
Duplicate the layer (Layer> Duplicate Layer or Ctrl+J) and add a layer mask to the new layer (Layer> Add Layer Mask> Reveal All).
Step 3
Make sure the layer mask is activated. The thumbnail of the layer mask in the layers window should have a white border around it. If it doesn't, click on the thumbnail to activate the layer mask.
Step 4
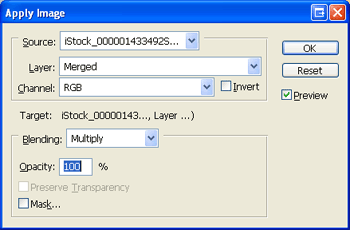
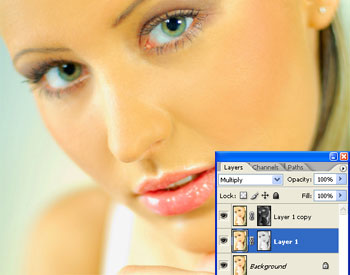
With the layer mask selected, open the Apply Image tool (Image> Apply Image). The default settings should be fine so you may simply click OK if the settings are default:
Layer: Merged
Channel: RGB
Invert: Unchecked
Blending: Multiply
Opacity: 100%
Step 5
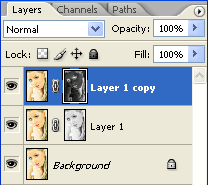
Duplicate the current layer (Layer> Duplicate Layer or Ctrl+J).

Step 6
Activate the layer mask of the top layer. Make sure the layer mask is activated. The thumbnail of the layer mask in the layers window should have a white border around it. If it doesn't, click on the thumbnail to activate the layer mask.
Step 7
With the layer mask activated, Invert (Image> Adjustments> Invert or Ctrl+I).
Adjusting the Contrast Layers
Now that we have the contrast layers created, the rest is very simple. Simply follow these steps to achieve your desired effect.
Step 8
Change the blending mode of the layers to the following:
- For a high contrast effect:
Top Layer: Screen
Middle Layer: Multiply
- For a low contrast effect:
Top Layer: Multiply
Middle Layer: Screen
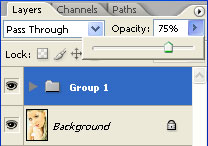
Step 9
To reduce the strength of the effect, select the top two contrast layers and group the selected layers (Layer> Group or Ctrl+G). Then, select the new group and adjust the opacity.
Final Results
")
")
Source: http://photoshoptutorials.ws/photoshop-tutorials/photo-retouching/contrast-layers/all-pages.html